Gardening is something I’ve always admired. From the outside, it looks so fulfilling to plant something and be able to harvest the fruits of your labors. We farm, so I understand a lot of what goes into gardening. Farming and gardening are indeed very similar. But for some reason, gardening has always felt so intimidating to me.
Ever since we built our house, I keep telling myself I need to try my hand at gardening. I am not a green thumb and I know zero about gardening. I’ve successfully grown SOME herbs in pots before and that is the extent of my experience with planting anything. I know, it’s crazy that I am married to a farmer, but not a natural green thumb. This year I deemed to be the year I try.
Over the winter I spent some time researching all things gardening. How big of a garden, what kind of garden, what to plant, etc. Since I didn’t want to have to drag my husband into my crazy idea I decided I could construct a cinder block garden pretty easily myself. Plus, I like that it isn’t so permanent that I can always add on to the raised bed in the future. Cinder blocks are also fairly inexpensive, but most of all they don’t require any extra materials like a saw or nailer.
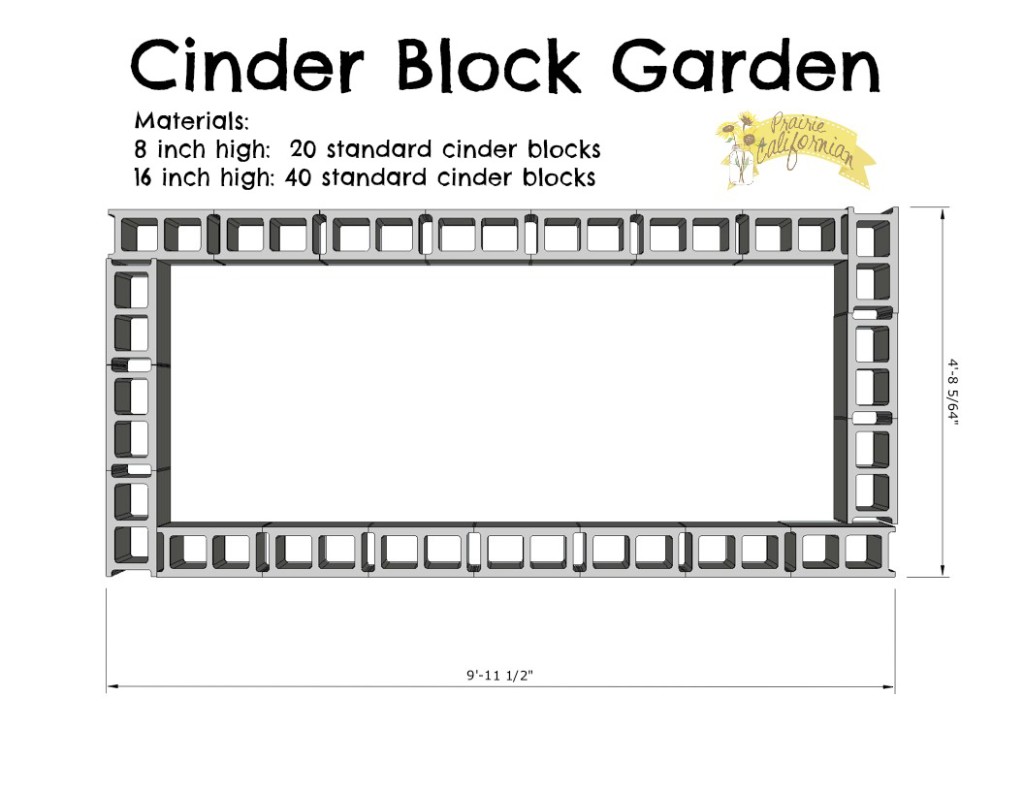
Standard cinder blocks are 8″ x 16″ x 8″ so with a little math I could figure out beforehand how many I needed. I decided to start with a raised bed that is 4′ x 10′. The 4′ width is great because it isn’t too far for me to reach in the middle. I don’t know where I got 10′ but it seemed like a manageable size to start. For a 4′ x 10′ raised bed cinder block garden that is 16 inches high, I would need 40 cinder blocks. As you can see in the sketch below, the dimensions aren’t perfectly 4′ x 10′ but it is close enough for me.
You can always just use one level of cinder blocks if you didn’t want your garden to be as tall. I used two levels of cinder blocks which made it 16 inches high. A side note on construction, you will want to ensure that the corners meet as shown in the diagram above. You will also want to stagger your cinder blocks for the second level to help ensure stability. My hubby pounded stakes into all four corners to help with reinforcement. It also provides us a place for if we ever need to fence the garden, we can.
I read oodles and oodles of articles discussing how and what to fill your raised garden with, depending on the quality of your soil. Anything from compost to mulch. I didn’t do anything fancy with mine. We have pretty good topsoil here in North Dakota and I had access to a bunch of it. One loader bucket full and my raised bed was full! I even had enough to fill some of the cinder block holes where I plan to plant some herbs. Since we have access to farm supplies, we used a sample of corn starter fertilizer before planting.
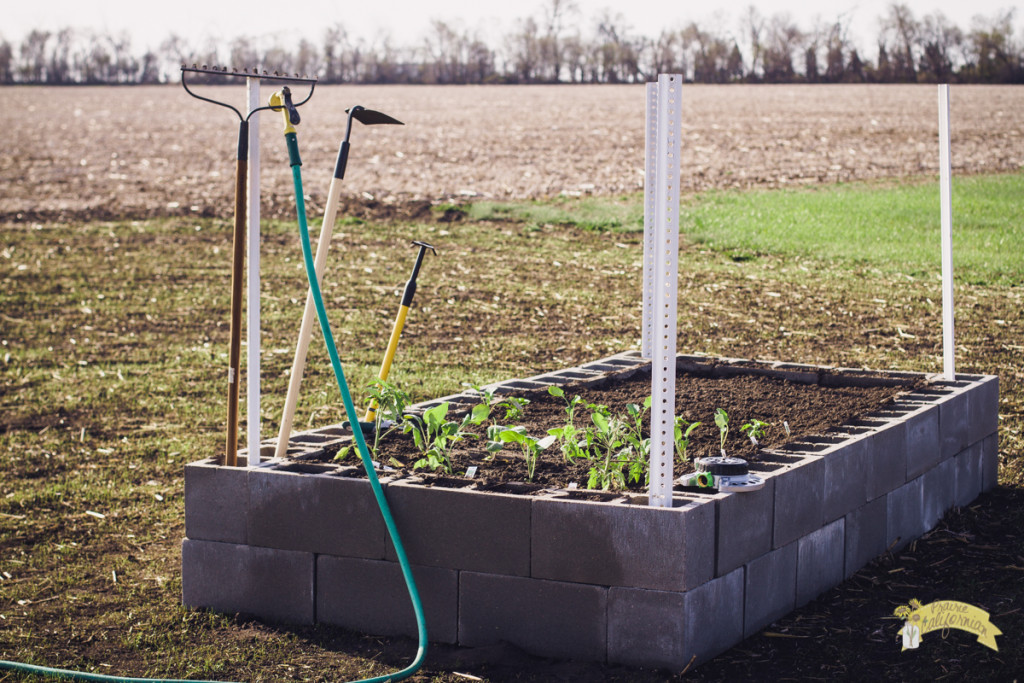
And here’s what it looks like once it is all complete!
Coincidentally enough, upon posting via social media about my garden, my friend Janice who works for Monsanto as their Online Engagement Director caught wind of my first ever garden experience. They are running a program for blogger’s this year called #HeyLetsGrow and she invited me to join them.
I am pretty jazzed to be involved in a group of newbie gardeners, but even more excited to have all sorts of seasoned growers to answer my questions! Like I said above, gardening has been so intimidating to step into and sometimes I feel like information overload. There are so many conflicting opinions and advice, it is extremely hard to sort it all out.
The #HeyLetsGrow program already had our first Google Hangout where we discussed: planning what you want to grow, thinking through buying plans or starting from seed, different types of garden possibilities (raised beds containers, and direct to soil) and how to make these growing environments successful for plants, and finally soil health!
Those discussions helped guide me in what to grow in my garden. The hubs eventually gave in and helped me with the garden (on my birthday weekend, ain’t he the best!?). And you guys, I can already tell how addicting this will be. Pretty soon I’ll be like the meme “MUST GROW ALL THINGS!!!”
Of course, this whole journey of my first garden ever has to be recorded on the blog. I will share with y’all what I planted and how I made decisions next week! So stay tuned for lots of gardening posts to come! I just keep praying that SOMETHING will grow, all while expecting nothing to grow! HA! Set the bar low to start, right?
You can follow along with all of the #HeyLetsGrow bloggers by following the hashtag on Facebook, Twitter, and Instagram. The gardeners at Monsanto will also be sharing information and tips and tricks for gardeners.
Do you grow a garden? What is your best gardening advice? Please share below!!
Disclosure: Some materials and vegetable seed in this series has been provided by Monsanto. However, the content and opinions expressed are that of Prairie Californian.


Your garden looks great! It’s so exciting to take on a new project like this, especially during the spring and warmer months. #HeyLetsGrow program sounds awesome, and it’s really cool that you get to be a part of it! Nicely done! Thank you for sharing!
Hey Jenni, I am anxious to see how your Brussel sprouts turn out this year. I have a raised garden in a reclaimed feed trough. I tried sprouts last year. Was really excited all thru the year, but it seemed like the season was to short or I just gave up. I started getting sprouts, but never finished. I really underestimated the amount of space they take up as well. Really large heavy plant. Good luck. Cant wait to see how they turn out
This is quite inspiring. I’m considering getting into gardening as well, not just for the plants, but as a hobby as well. You made it look so easy and fun–I’m quite convinced.
Wow, this is awesome! Your garden looks great already. I love the way that you set up the cinder blocks. It makes your garden look so spacious and provides an excellent foundation! Nice work! Thanks for sharing this with us!
Author
Thank you!
Hey Jenny,
I’m a sucker for DIY projects. You really inspired me with your project.
Thanks for sharing!
June 🙂