
Last week, we talked about two out of the three elements in what is known as the Exposure Triangle: aperture and shutter speed. We talked about how you can use and utilize shutter speed and aperture to get the perfect exposure. Now let’s add one more element into the equation.
ISO.
What is ISO?
In the days of film photography, ISO was known as ASA and it was the indication of how sensitive a particular film was to light. This measurement is indicated by numbers (that you’ve probably seen on films) 100, 200, 400, and so on. The lower the number, the lower the sensitivity the film is to light AND the more fine the grain of film will be. Vice versa, the higher the number, the higher the sensitivity to light AND the more grainy the photo film will be.
In digital photography, ISO functions much of the same way, but instead of film, ISO measures the sensitivity of the sensor in your camera to light. And just like in film, the lower the number the less sensitive your camera is to light AND the finer the grain. The higher the number the more sensitive your camera is to light AND the more apparently the grain will be. Grain a lot of times in digital photography is called “noise”. When you zoom in really close to images taken at a high ISO, you will actually be able to see the grain more so than if you took the image at 100 ISO.
100 ISO is considered standard and if you set your camera to Auto, it will usually select ISO 100 as the standard or try to keep your ISO as low as possible. I mean, it makes sense to keep it low or even don’t change it because the higher ISO we go, the more grain and the more light will be coming into our photos.
So Why Would We Need to Change ISO?
So what happens when changing our shutter speed and aperture don’t work….? We change the ISO. In situations where you are in low light, you may not be able to open up your aperture any more OR you may not be able to slow down your shutter speed without getting a blurry image. Boost your ISO. Events indoors like sports, concerts, museums, and even sometimes our own homes where there is little light, ISO will help you get correctly exposed images.
When you bump up your ISO, you will notice that it will allow you to utilize your shutter speed and aperture more effectively so you can correctly expose. For example, if you bumped your ISO from 100 to 400, you will be able to shoot at HIGHER shutter speeds and smaller (more closed down) apertures all while remaining in the same lighting conditions.

The Exposure Triangle
The exposure triangle is something that is difficult to explain. Put very simply, it’s how aperture, shutter speed, and ISO all work together in order to expose an image. But how do they work together and how does one affect another?
Think about it like this… Your camera is like a window. Your aperture is the size of the window. Your shutter speed is the amount of time the shutters on the window are open. And you inside the room with some sort of eye shield (like sunglasses) are like ISO. Depending on your sensitivity, the aperture and shutter speed may be letting in too much light or too little light. There are a number of ways to increase the light in the room. You could increase the time the shutters are open (decrease your shutter speed), you could increase the size of the window (increase or open up your aperture) or you could take off your eye covering so you become more sensitive to the light (like increasing ISO).
Practice, Practice, Practice
Mastering exposure will only come with lots of practice. In many ways, it’s something that even more experienced photographers STILL juggle. Something to keep in mind is that changing each element of the exposure triangle not only impacts the exposure of the image, it also has an impact upon other aspects of your image as well. For example, changing the aperture (like we learned last time) will change the depth of field, changing the shutter speed will impact how motion is captured, and finally changing ISO will affect the graininess or noise in the photo.
Start slow and gradually make changes. Once you feel comfortable using your camera on aperture priority with AUTO ISO, change it up. Start bumping the ISO and see how it affects your images.
So now that we know about exposure and how to achieve it perfectly… let’s talk about other elements that make up a great photo. Color rendering is important. Have you ever taken a photo and had it turn out really blue? Or how about really yellow? You probably did what the rest of us did, fixed it in a program like Photoshop. But did you know you could fix it IN camera? White balance is your solution.
White Balance
What is white balance?
The most simple definition of why we adjust white balance is to get the colors in your images as accurate as possible.
So even though the scene make look normal to the naked eye, we still get those images described above. The reason is because of different light sources have different color (or we call it temperature) and affect how the camera sees them. The blue images? That is thanks to fluorescent lighting. The yellow images? That is thanks to tungsten type bulbs such as incandescent lighting.
We don’t generally notice this difference in temperature because our eyes adjust automatically for it, but our cameras don’t. Unless you have your camera on Auto WB, it will try to compensate for this. Camera companies have tried to make it easier for us all by developing presets for white balance like daylight, cloudy, indoors, etc. where we can choose our conditions and the camera will automatically adjust the white balance accordingly.
There are a TON of products out on the market to help you with your white balance. Anything from camera lens cap to gray cards and depending on who you are asking, every photographer has a different way of achieving perfect white balance. But here’s the way I do it that doesn’t require any extra equipment.
Kelvin Scale White Balance
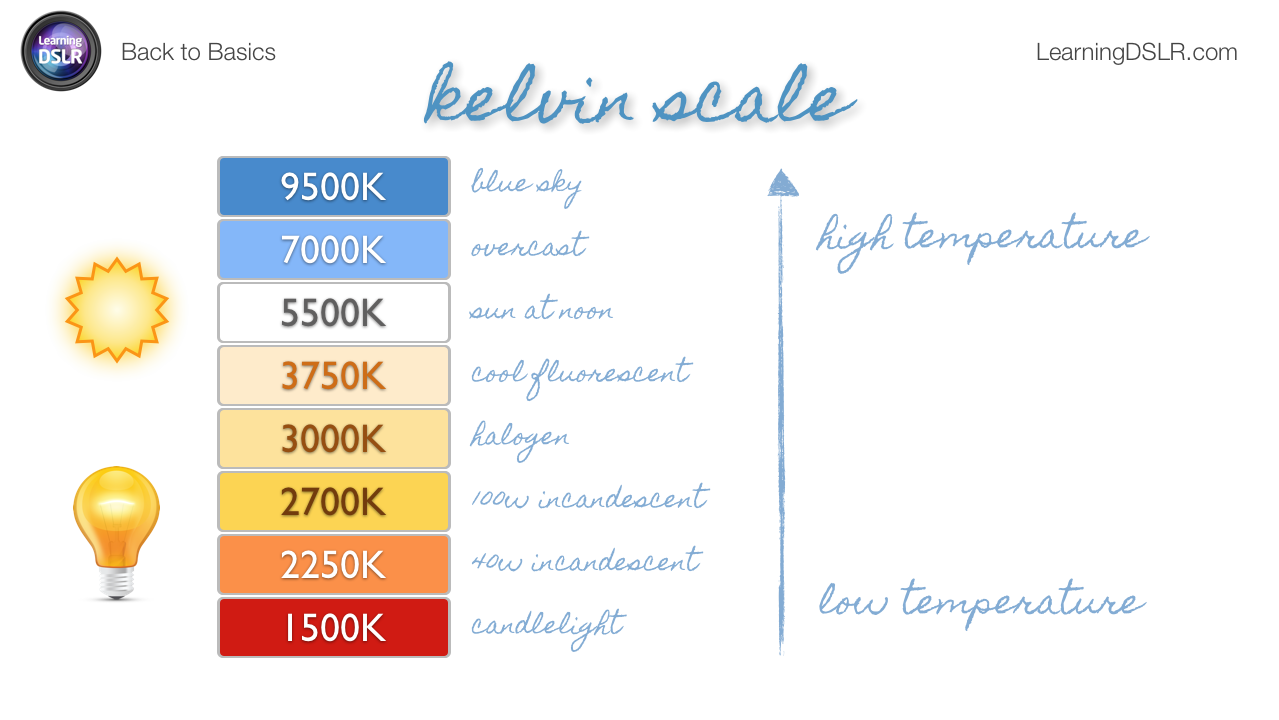
The color (or temperature) of light is measured using the Kelvin Scale. In the diagram above, you can see the lower numbers equal warmer or red/yellow light and the higher numbers equal cool or blue light. You can actually manually set your camera to a specific Kelvin depending on the conditions you are shooting in. The temperature scale most often used in photography ranges from about 2000k to 9000k. On average, most photographs are shot between 5000k and 7500k, but I have been known to dip down into the 3000k when indoors.
Of course, sometimes these numbers aren’t absolute and are just estimates. We may adjust them to match the temperature of light we are shooting in. Let’s say I may be indoors but also have some cooler light coming in from outside. This “mixed light” would result in me bumping up my white balance up the kelvin scale because the light isn’t as yellow as if I was just getting the incandescent light. The blue light of the window actually brings me up the Kelvin scale.
It seems intense to memorize this chart, but honestly, once you start shooting in different conditions, you pick these numbers up rather quickly. You will find that with time and practice, you will be able to set your white balance much like you do your shutter, aperture, and ISO.
Oh and here’s a little trick I use to set my white balance using the Kelvin Scale. Turn your camera’s live view mode on. In live preview mode, often used for video, push the WB button and dial in your Kelvin temperature. You will see the changes happen in real time in your camera. It really helps you practice and dial in the perfect white balance.
I really encourage you to try out some of the things mentioned above, actually trying out these lessons will help cement them versus just reading them. Manually change your white balance, play with the exposure triangle. Practice makes perfect so get out there and start shooting!
Next Week: Metering
Using Photography to Tell Your Story Series:
1. Introduction
2. Photography Q&A with Jenny
3. Photography Basics
4. Aperture and Shutter Speed


So I’m just now getting back to the blogging world, and your new Website is amazing! Love the color palette and design.
That’s all. 🙂
Well written, I like how you explain the exposure triangle in pretty simple terms. I think many newcomers make a 1-1 comparison of Film ISO to Digital ISO, when the two are similar in result, but very different in the mechanics. People converting from film to digital are usually disappointed that they can’t take the same pictures using the same exposures with similar equipment. Would you say that the capability of the lens and how much light it can get to the sensor becomes the most important piece of the triangle next to the capability of the sensor to record the data?
Author
James, Thanks so much for stopping by and commenting!! And yes, I have to agree with you on your question. For me the lens and it’s ability to let in light becomes more important to me than my camera sensor trying to read the light. Often times I will intentionally shoot lighter or darker because my camera is confused about light. 🙂