
For years I have always been terrified of canning. I am not sure if working in the meat industry had me leery about botulism and other bacteria or what my problem was. To me, canning seemed like this daunting task left to the best housewives and homemakers. So I let my fear get the best of me and shied away from ever canning… Until last year. I had several friends on social media sharing their bounties from canning and I got brave. I read up on tips, tricks, how-to’s, and other resources on canning for several days leading up to the weekend I slated to can.
I headed down to our local hardware store, purchased the bare essentials, and decided to give it a go. I made a plan for the day; I was going to be the queen of jams and jellies that day. I had strawberries, melons, and some apples I needed to use up. It was a heck of a lot of work, but it was addicting. Some of the things I tried were successful and some of the recipes I tried were utter failures. But, all my jars sealed! So I took that as a win. I was hooked. I even wrote a post about the Life Lessons I Learned from Canning.
Since then, I have continued to can jams, jellies, and salsas whenever I have an abundance of fruit or vegetables. It has become second nature to me, I have developed a system, a rhythm, and now I really enjoy canning. I’ve had several people ask me how I can, what they need to can, and so I figured I would write a little intro to canning for those who, like me, are intimidated about canning.
[printfriendly]Tools Needed to Can
Jars, Lids, & Rings:
Make sure you are using jars that were made for canning. Don’t try and use leftover jars from spaghetti sauces, jams, or other things that come in glass jars. I use Kerr or Ball jars with rubber rimmed lids, and screw top rings. You can find the jars, lids, and rings at most grocery stores. You will want to inspect your jars for cuts or nicks (if using used jars) as well as your lids to ensure the rubber is good on them, no cuts or pieces missing.
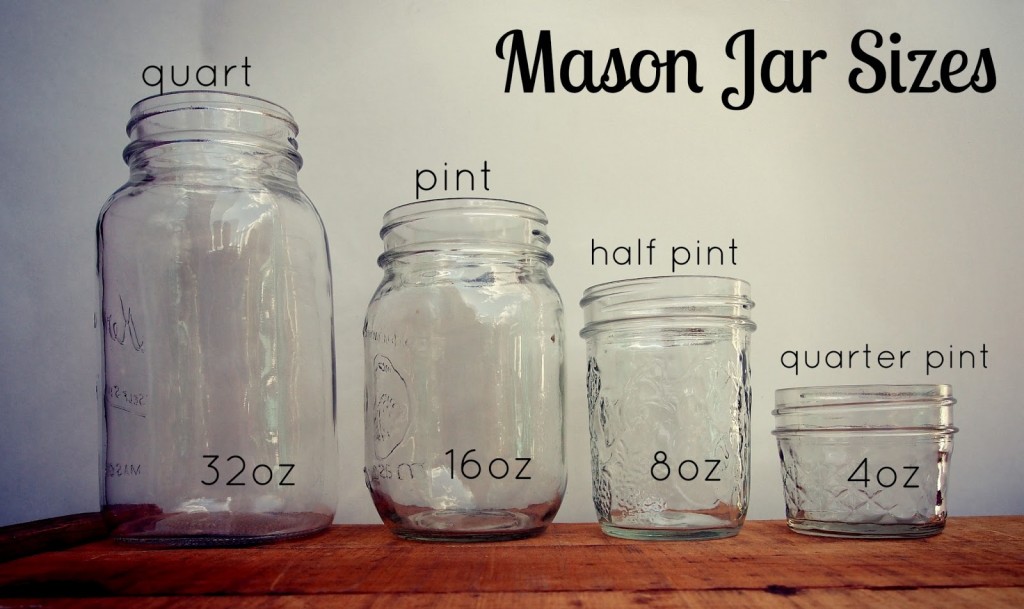
When I first started, I had no idea what a quart sized jar looked like, or a pint jar, or a half pint. I found this photo extremely helpful to make sense of all these used jars I had in my cupboard. There are also two different styles of jars: wide mouth and regular. Wide mouth jars have a larger opening than the regular. This doesn’t affect your canning at all except for that sometimes the wide mouth jars are easier to get ladle into if you are messy like me. 😉
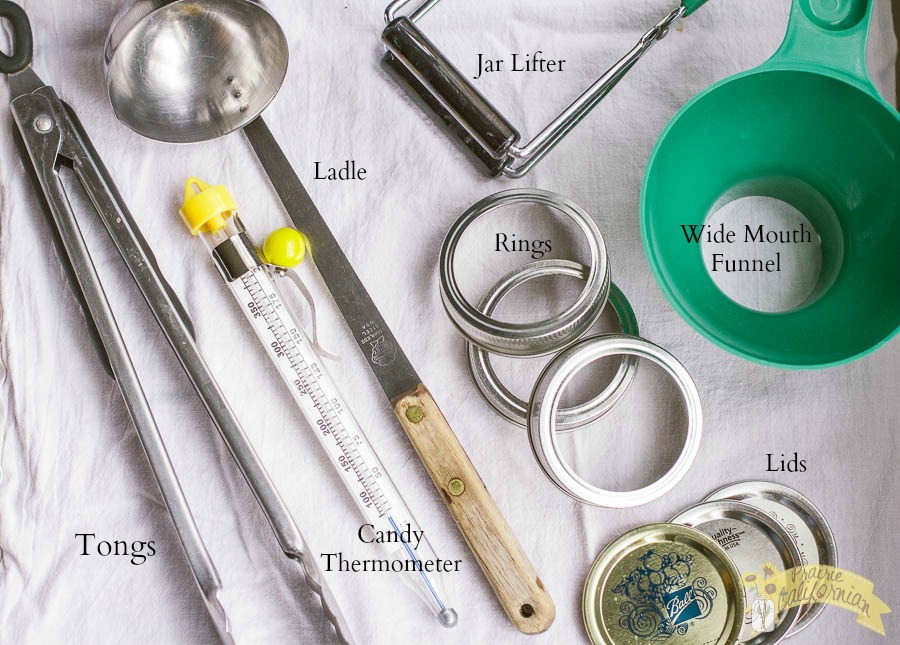
Wide-Mouth Funnel
A wide mouth funnel has a larger opening at the bottom. This allows things like chunky salsas, jams or preserves, or anything else chunky you may be canning to fit through. A typical funnel has a very narrow base. Tip from someone messy like me. Buy a Wide Mouth Funnel, you will spend more time cleaning up your jars than you will filling them. A funnel makes filling jars extremely simple and quick. And a lot less messy.
Ladle
You don’t need any sort of fancy ladle. Any sort of ladle will work. Why use a ladle versus a spoon? A ladle is simply easier to scoop and pour hot liquids into the jars using the funnel. You can see my super fancy ladle in the photo above.
Tongs
I use a regular pair of tongs as part of my regular canning equipment. I use the tongs to retrieve lids as well as submerge and retrieve empty jars. Some people use a fancy lid wand (a stick with a magnet on it) to remove lids from the boiling pot, I have found my tongs work just fine for me.
Jar Lifter
When I first canned, I didn’t pick one of these up. Just do yourself a favor and get one. It makes lifting filled jars out of your canning pot 110 times easier. A Ball Jar Lifter is specially designed to fit around jars and retrieve them from your canning pot. Many companies like Ball sell a Canning Starter Kit
which includes a jar lifter, a lid wand, and some other equipment.
Canning Pot & 1 Other Large Pot
So you will need some sort of pot to submerge all your filled jars into to “process” them. I bought a pot specially designed to can. It is a Granite Ware Water-Bath Canner with Rack, 21.5-Quart. It has a fancy rack in it that makes my life easier. Some people can using their regular pots and pans, but you will need to invest in a rack. The jars cannot just sit on the bottom of the pot. They make canning pots in several different sizes, I have one of the smaller sizes and it works for me.
You will also need another large pot if you are going to be making something like a jam or jelly that needs to be boiled. I use my regular stock pot for this. Whatever big boiling pot you’ve got will work just fine.
Lots of Clean Towels and Paper Towels
Canning is messy. You will need a lot of towels. When hot jars come out of the boiling water at any time, you will need a place to set them. I always put them on top of towels. This also acts as a buffer between your potentially cold counter coming in contact with your hot jars and breaking them. I use paper towels to wipe the rims of the jars before I put the lids on them.
Optional: Candy Thermometer
If you are going to be making jams or jellies, you will need a candy thermometer. Many jams and jellies recipes require them to reach a certain temperature. A candy thermometer hooks on the side of your pot.

That’s it! Fairly simple right?
How to Can for a Beginning Canner
1. Organize
Get out everything you will need to can. Tools, ingredients, anything! Canning is all about rhythm and having a system. If you are running to another room (for me, the basement) to get something you forgot, you will have a heck of a time. I lay out all my jars, making sure each one has a lid and ring. I have all my ingredients out of the cupboards. I chop anything that needs to be chopped or de-seeded so that all my ingredients are ready. I lay my towels and different work stations out. I make sure my sink is clear so when things are hot or needing to be rinsed I can do so easily. While I am prepping, I start my canning pot on the stove. My pot full of water takes about 20 minutes to boil, so this gives me plenty of time to prep.
2. Sterilize Jars and Lids & Make Filling
In order to ensure no bacteria gets trapped in your jars, you need to sterilize them. The easiest way to do this is submerge them in the boiling water for about 10 minutes. You will also need to throw in the lids only, not the rings, to sterilize them. This will also soften the rubber on the lids so that it gives you a good seal.
For jams and jellies, this sterilizing process is the perfect amount of time to put your jam in the pot and let it boil. For salsa, this gives me time to food process the ingredients and have it ready to go in the hot jars. The trick here is to time things so that when the jars come out hot, you will fill them with your ingredients. I retrieve my hot jars with just the regular tongs, being sure to carefully dump the hot boiling water out of them. I set the hot jars on a towel so that they don’t come in contact with my cold counter.
Some people choose to sterilize their jars and lids in a dishwasher by steaming them. I am never that organized or good to time that to make it work.
3. Fill Your Jars
Use the wide mouth funnel and ladle to fill your jars. Filling jars is an important part of canning. It’s like Goldilocks. They can’t be too empty leaving too much air space to potentially harbor bacteria, but they can’t be too full causing them to expand and overflow. Typically for things like salsa and jam, anywhere between 1/4 inch to 1/2 inch is perfect. I usually err on the 1/4 inch side of things. This is called “head space” in canning lingo, so if you read something that talks about head space, it just means the amount of unfilled jar.
Make sure there are no air bubbles trapped in your cans. You can get rid of air bubbles by swiping a butter knife around the inner rim of the jar. The starter canning sets have this handy dandy tool that measures your head space as well as gets rid of air bubbles.
Once your jars are filled, you will want to wipe them down to be sure there is NO filling left on the rims. Anything left on the rim of the jar could compromise your seal, so make sure you wipe them good. I use a wet paper towel to do this. Once your jar rims are wiped clean, put your sterilized lids on.
Then it is time to put the rings on. You will want to tighten the rings to “two fingers tight”. Basically until you can no longer tighten the jar with your pointer finger and thumb. Don’t crank on the rings to get them super tight, that isn’t necessary.
4. Processing Your Jars in the Water Bath
Lift the rack in your canning pot. It should still be boiling. Set the sealed jars on the rack and submerge them in the water. Make sure that your jars are fully submerged and have at least an inch of water above them. Put the cover on the pot and boil for whatever amount of time your recipe calls for. Typically most jams, jellies, salsas, etc. call for about 10 minutes.
If I haven’t organized well in the beginning, I use this time to prepare my next ingredients or wash up tools to make my next batch. Once the jars have processed, you will remove them using your jar lifter. The jars will be very hot so you will want to set them on a towel again. Typically I have one towel for sterilized jars and one towel for finished jars, one on either size of my stove.
You may notice that once you remove the jars from the pot, you will hear pinging noises. That is the sound of sweet success!! It means your jars are sealing! You can test the seal on your jars by simply pressing your finger on the middle of them. If they “click” or move at all, they did not seal. Do not try and store these jars outside of refrigeration or they will go bad. Sometimes jars take some time to finally seal, so give them some time. But after 24 hours, if they still haven’t sealed just put them in the fridge.
And you’ve just done it! Hooray! Welcome to Canning!
Some Other Safety Information About Canning
Follow the Recipe
Canning is NOT cooking. Don’t try to take your own spin when canning. Canning is more science based than it is culinary based. Processing times vary, depending on its acidity/pH level. When you don’t follow the recipe, you could be compromising your food safety.
Check to Ensure What You Are Canning Can Be Water Bath Processed
You can only water bath process foods with high acidity. DO NOT can anything that isn’t meant to be processed in a water bath. High acid foods typically include: fruits, jams, jellies, salsas, tomatoes with added acid, pickles, relishes, chutneys, sauces, and vinegars. The acidity level in foods can be increased by adding lemon juice, citric acid, or vinegar. Most jam and jelly or salsa recipes will include this, tomatoes are also typically acidic enough to meet the required pH lower than 4.6
Non-pickled meats, vegetables, or other foods will REQUIRE a pressure cooker, not a water bath. Low-acid canned foods are not acidic enough to prevent the growth of bacteria without a pressure cooker. Acid foods contain enough acid to block their growth, or destroy them more rapidly when heated. Low-acid foods have pH values higher than 4.6. They include red meats, seafood, poultry, milk, and all fresh vegetables except for most tomatoes.
Do Some Research and Reading
There are a ton of great resources out there for canning. This is simply what I do and I am sure you can find some other great tips through reading other resources. Google questions if you aren’t sure. Ask someone who cans regularly. Or if all else fails, visit the Canning Section over at USDA. Also, your county extension office usually has some resources for home preserving and canning.


It seems SO daunting! I am a rookie and truly appreciate this post! I will be pinning and saving for next year, I don’t think I have anything left to make for this year, but we’ll see how the farmer’s markets are!
Would you like to post this to my canning link up?
http://www.crookedlakefarm.com/blog/2014/home-canning-green-beans/#.VATR7Sm9LCQ
Author
Just added! Perfect, thank you! Great post BTW!
Great post Jenny! I am pretty lucky as my husband takes care of the garden, freezing and canning. I love his recipes so it works out. He is going to make a batch of homemade Ragu this week. It is so satisfying to eat what you grew in your own yard! And a lovely reminder that summer will come again on the dark days in January & February!
I also recommend using a magnetic lid lifter if you hot water bath can. Great post!
Great Post Jenny! Here are two little tips I came up with over the years:
First – clean your counters off first. Seriously – you will need the space. Put away what needs to be put away, and do the dishes first (or load the dishwasher).
And Second – if you can its great to create two workstations. For me, the counter to the right of the stove is for the jam, salsa, etc ingredients. The counter to the left is for the jars rings and lids, and towels to put the hot jars when they’re done.
Thanks again!
Excellent post jenny! I Always thought that can is just be done via machines but you just made me amaze. How wonderful job you have done and made us to do so. I love your post and will definitely try this out. Thanks for such an interesting and helpful post.