Today I want to talk about light… Light is everything in photography! Knowing how to see light and use light correctly sets a good photographer apart from a sub-par photographer. Even if you aren’t the best photographer around, if you know how to use light, your photos will instantly improve no matter how you are shooting. Light is something that if you are a natural light shooter, you should be looking for all the time. Even if you don’t have your camera in your hands, recognize light, identify light.. By learning to see different types of light, we become better photographers. When we put in any given situation, we can make the best of it and come out in the end with beautiful photos.
There are two steps to successful lighting during a photoshoot. First is seeing and identifying the light. Knowing how to use that type of light, knowing how to pose your subjects in the light. The second step is telling your camera how to read the light. Letting your camera know what will be exposed correctly and will be middle gray. Middle gray is a photography concept in something called Zoning. It deals with exposure and metering. Basically, the simplest definition of middle gray is that it is a tone halfway between black and white. And it is also what your camera reads as perfectly exposed. Sometimes we have to lie to our light meters in order to get a correctly exposed image. This is a rather advanced concept in photography so if you are interested, this article does a pretty good job of breaking it down.
So, back to light! In all lighting situations there is one thing we always need to be looking for: reflective surfaces or anything that is going to bounce light. This can be anything, white walls, cement, the sky, or even added reflection from a reflector. Identifying your light source AND potential reflectors can improve any lighting situation. When you are shooting, ask yourself, is there something I can do to make this better? If so, find it and use it! Maybe it may simply be moving your subject closer to a window or wall or even adding in a reflective surface to bounce more light onto your subject. I will talk more about reflectors next week when I talk about gear but they work like magic when used correctly and can help you out in some difficult lighting situations.
I want to share with you 8 different types of light. These can be found in your everyday life, can be utilized without any additional gear (like flash), and when used correctly will yield you amazing images.

1. Undercover Light/Open Shade
Open shade is probably one of your easiest lights and go-to lights to shoot in. It’s very flat and uniform light. It doesn’t yield very dynamic or dramatic photos. A good trick to finding open shade during anytime of the day is to find a North facing wall. Since the sun rises and sets east to west, a North facing wall will always have the sun behind it. As with any lighting situation, not all open shade is created equal. Some open shade is very blue and you need to watch for this. Adjust your white balance in camera or be prepared to edit the color balance in Photoshop.
2. Barn Door Lighting
Barn Door Lighting is the perfect lighting to use in inclimate weather or it can be used even when you’ve got nice weather outside. One trick is to find find a North facing doorway and put your subject in it. Much like we discussed above, this would be your most ideal location. In Barn Door light, you will want to position your subject just inside the doorway so that they aren’t out in the sun but that the sun is still shining in fairly bright on them. The right position will allow for a beautifully lit subject with a background that just sort of falls off to dark or black. It’s important when metering to spot meter on your subject’s face in barn door lighting because otherwise your camera will compensate for the dark surrounding and extremely overexpose your image.
 3. Glow Light
Glow light is a variation of barn door lighting. Basically you position your subject the same as in barn door BUT back them up into the doorway. The further away the subject gets, the smaller and more intense the light source will become. Often times this light can be soft and subtle and it may take some moving to find that exact sweet spot. As with barn door light, you will want to spot meter to ensure that your subjects face will be exposed correctly.

4. Window Light
Window light is a gold standard in photography. It is used by all photographers of any caliber and is a truly go-to light in ANY situation. Window light CAN be glow light depending on how big your window is OR it can be much more even and uniform light. The closer you put your subject towards the window, the more clean and bright your image will become. If you are ever stuck in a photo shoot, Window light is your answer. It works everytime!
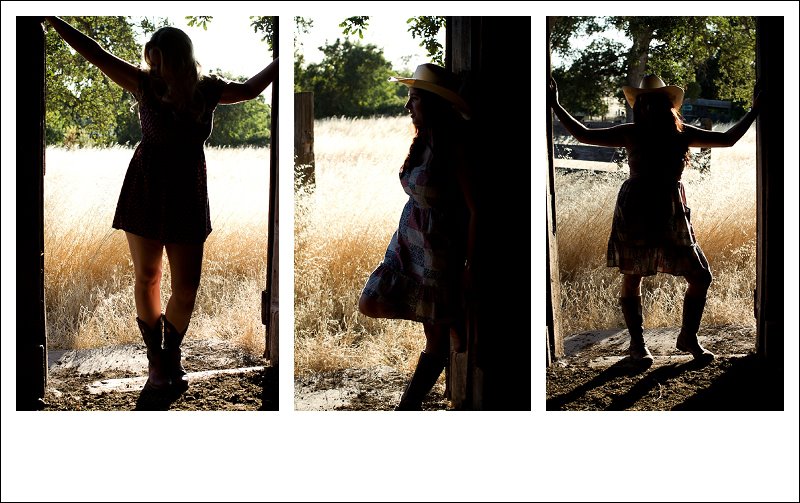
5. Silhouette
In this particular example image, we have a reverse barn door style of lighting. Instead of exposing for the subject’s face, we are exposing for the sky behind the subject. Silhouettes can work anywhere you are going to be photographing a subject with a bright background. You can photograph a full silhouette where you have a nice crisp black or partial silhouette where some of the subject and detail is left. Silhouettes are moody and dramatic. They are great practice for switching between this style of lighting and backlight (discussed below). Try to photograph a silhouette and then photograph the same image but with your subject exposed correctly.

6. Direct Sunlight
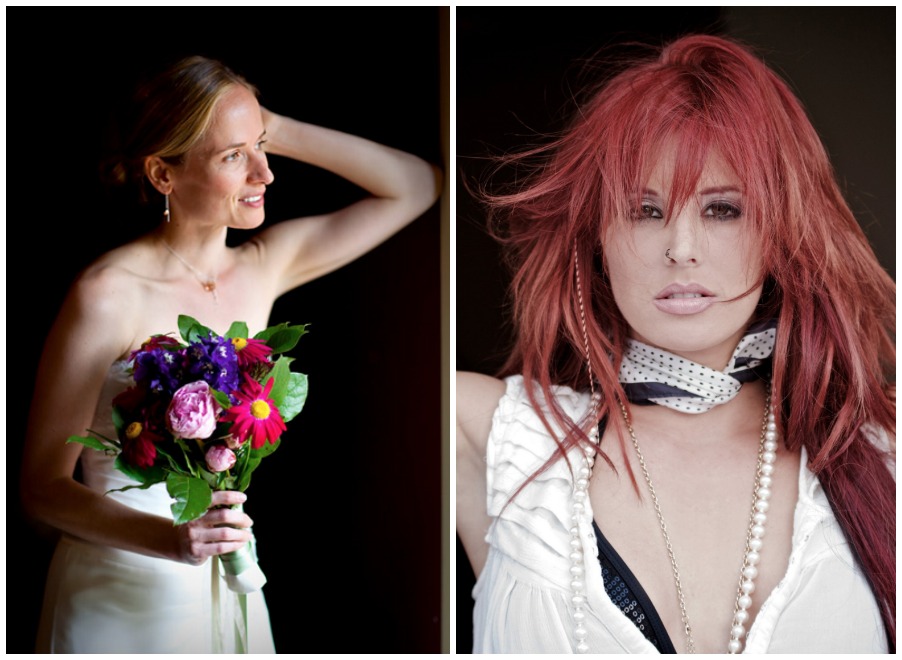
Often times photographers are so scared of shooting in direct sunlight, usually around high noon, or when the sun is higher in the sky. Shooting in direct sunlight gives people dark shadows under the eyes and nose and is really unflattering. Usually in direct sunlight, the sun is directly in your subject’s face and makes it difficult to get good shots without your subject squinting. Usually direct sunlight photos yield dramatic and bright images and you will want to matrix meter for the entire scene. There are several tips and tricks to shoot in direct sunlight. First tip is to face your subject into the sun and bring their face up. In this position, the sun will be right in their eyes. You as a photographer can either choose to take an eyes closed photo OR you can ask your subject to close their eyes and on the count of three open, the small window of time they open their eyes, you take your shot. Another possibility is using a reflector to overpower the sun (left image) or using a diffuser on top of the model to diffuse the high noon sun which yields a softer result (right image). All of these tricks are ways to shoot in high noon without getting harsh shadows.
7. Backlight
Backlight is when you put the sky behind your subject. Your light source is located behind your subject. In this type of lighting you will want to make sure you meter for your subject’s face once again. You will often times want to overexpose the image a few stops as well to ensure you are getting the right exposure on the subject’s face. If you don’t meter for the subject’s face in this situation, you will end up with a silhouette. Backlighting is achieved outdoors when the sun is lower in the sky so late in the afternoon and evening will be your best times to get backlight or early mornings as well. You can achieve backlighting during high noon, it just takes getting down low and getting creative with angles as the photographer.
 8. Solar Flare
This was a popular style of photography in the 70’s. Pick up any album cover and you will see that dreamy, yellow, hippy-esque sunshine image. The difference between this style of lighting and backlight is the photographer. In this lighting, it works best when you as the photographer are in the subject’s shadow and again, meter off of the subject’s face. Then once you have metered and are ready to take the photo, shift to one side just a bit to catch the light and the sun popping out from behind your subject. You can also ask your subject to move or dance or whatever to allow that light to peek from behind them. Solar flares are a fun technique to master and can be applied to more situations than just a portrait.
These are just a few basic types of lighting techniques for shooting in natural light. There are other types of lighting situations once you get into adding flash and studio lighting, but learning to identify these will give you a solid basis to photograph in any outdoor lighting situation. As a photographer, you don’t need to be restricted on when or even where you can shoot! Learning to identify different types of light will allow you to be flexible when shooting clients or even hobby photography and will also improve your images two-fold.
If you are interested more in lighting, here is a GREAT video from the Framed Network!
Next week I will talk about GEAR! Bodies, lenses, reflectors, all the fun stuff! Have you been practicing!?
Using Photography to Tell Your Story Series:
1. Introduction
2. Photography Q&A with Jenny
3. Photography Basics
4. Aperture and Shutter Speed
5. ISO and White Balance
6. Metering


2 Comments